31 Ekim 2023 Salı

Google Play Games Beta NU80040811 Hatası

  Google play games tarafından henüz beta olarak sürülen program sayesinde android telefonlarda oynanan bazı oyunları bilgisayarınızda oynayabileceksiniz. Tek yapmanız gereken bilgisayardan google play sitesine girip programı indirip kurmanız yeterli fakat bunun için sistem gereksinimlerini kontrol etmek gerekiyor.


 Bilgisayarınız aşağıdaki gereksinimleri sağlamıyorsa nu80040811 kodlu hatayı alacaktır. Bu hata için bilgisayarınızın hiçbir ayarını değiştirmeyin. Aşağıdaki gereksinimleri karşılamıyorsa yada windows 10 yüklü değilse google play games betayı çalıştıramazsınız.


 Program henüz yeni olduğu için bazı hatalar olabilir. Bu program aynı android emülatörler (bluestacks, memu, lpdroid vs) gibi bilgisayardan android oyun oynamanızı sağlıyor. Özellikle clash royal, clash of clans gibi oyunları bilgisayardan oynandığında bazı kullancılarda banlanmasına neden oluyordu. Artık google kendi resmi programını çıkardığı için sorun olmayacaktır.

 Şimdilik win 10 da çalışan bu program daha sonra alt versiyon windows da çalışabilir. Henüz beta olduğu için bu konuda yorum yapmak erken görünüyor.

3 Ekim 2023 Salı

CBC SPORT YAYIN AKIŞI

  Birçok izleyiciler tarafından bilinen CBC Sport Azerbaycan kanalı Türk takımlarının maçlarını düzenli olarak yayınlıyor. Bazı durumlar da ( Azeri takımlarıyla Türk takımlarının aynı saate gelmesi) temsilcilerimizin maçlarını izleyememe durumuyla karşılaşabilirsiniz. Bunu önceden anlamak için kanalın yayın akışını aşağıdaki linkten tıklayıp öğrenebilirsiniz.

  https://www.cbcsport.az/  Bu link CBC SPORT AZ nin resmi sitesidir. Buraya tıklayıp sağ taraftaki barı indirip yayın akışını görebilirsiniz.


 Örneğin Avrupa'daki temsilcimiz Galatasaray'ın şampiyonlar ligi maçının yayını olup olmadığını kontrol edelim. Bildiğiniz gibi Azerbaycan bu sene şampiyonlar ligine takım gönderemedi. Ön elemeleri geçemeyen Bakü takımı Avrupa macerasına UEFA avrupa liginden devam ediyor. Bu durum da Azeri izleyiciler Türk takımlarının maçlarını izlemek istiyorlar. Düzenli olarak Galatasaray'ın Avrupa maçlarını izleyebilirsiniz.

 Temsilcimiz Galatasaray Okun Buruk yönetimindeki Avrupa macerasına 2-2 Kopenhag beraberliğiyle buruk başladı. Bakalım bu maçta Manchester United a karşı avantajlı bir skor elde edecekler mi CBC Sport ekranından görebileceksiniz.

1 Ağustos 2023 Salı

E TEP Sınavı Nedir? E TEP Sınavı Hakkında Bilgiler

  Uzun süredir YDS ve YÖKDİL sınavlarının içeriği tartışma konusuydu. Öğrenciler ve eğitimciler sınavın dil becerilerini test etmediği ve bu sınavların okuma ve dil bilgisini test ettiğini ayrıca yabancı dil sınavında dinleme,yazma ve konuşma olması gerektiğini sürekli dile getirdiler. Sonunda ÖSYM değişiklik yapmaya karar verdi ve E TEP adında yeni bir sınav sistemine geçiş için adım attı.

 E-TEP’in 4 becerili dil sınavı 2024 ikinci çeyrekte ilk olarak yapılması planlanıyor. Milli Savunma Bakanlığı personeli yurt dışı görevler için bu sınava girecekler. 2024-2026 arası hem yds hem etep geçerli olacak. 2027’de ise sadece E-TEP geçerli olacak. Kısacası ilerleyen yıllarda YDS tamamen ortadan kalkmış olacak.


  Şimdi ise düşünülen ÖSYM nin bu sınavı nasıl ve ne şekilde yapacağı? Sınav yerlerinin uygun alt yapısı olacak mı? Örnek verirsek YDS sınav yerleri için liseler ve üniversiteler tercih ediliyor. E TEP sınavında dinleme için uygun cihaz olması gerekiyor. Bunun gibi birçok sorular sosyal medyada ve forumlarda bulunuyor.

 Öncelikli olarak ÖSYM 10 büyük ilde bu sınavı uygulayacağını daha sonra da diğer illerde yapacağı düşünülüyor. E YDS gibi başlangıçta belirli sınav yerleri olacaktır. 

 YDS sisteminde değişiklik olması kurslarında eğitim sisteminde değişiklik olacaktır. IELTS ve TOEFL gibi sınavların eğitimini veren kurslar E TEP sistemine uyum sağlayacaktır. Fakat sadece YDS sisteminde eğitim veren kurumlar E TEP sistemine uygun öğretmen kadrosu kurmak zorunda kalacaktır.

 Sınavın içeriği hakkında ÖSYM nin zaman geçtikçe daha detaylı açıklama yapması ve örnek bir sınavı sitesine eklemesi bekleniyor.

 ÖSYM den yapılan açıklama beklenenin dışında oldu. E TEP sınavı YDS,YÖKDİL gibi akademik dil sınavlarının devamı yada yenisi olmayacağını sosyal medyada bildirdi. Bu sınav farklı bir sınav olacak ve YDS ve YÖKDİL sınavları aynen devam edeceği ÖSYM tarafından açıklandı.

 Gelecekte üniversiteler akademik kariyer için bu sınavı değerlendirmeye alır mı? bilinmiyor. Şimdilik bu sınav bakanlıktaki yurt dışı görevi ve Milli Savunma Bakanlığı personeli için uygulanacaktır.

 Bahsedilen yeni yabancı dil sınavı IELTS benzeri dört becerili bir sınav olan #ETEP. Şimdiye kadar bir pilot sınavı yapıldı. Aralık ayında Milli Savunma Bakanlığı çalışanları için, Ocak-Şubatta diğer bakanlıklar için deneme sınavları yapılacak. Sınav ise 2024 Haziran'dan itibaren uygulanabilir görünüyor.

30 Mayıs 2023 Salı

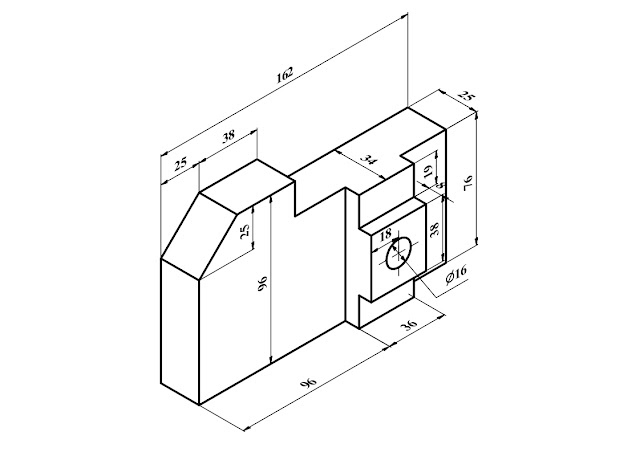
FreeCAD Part Design Technical Drawing

 Freecad is an open source CAD program to create your own designs or drawing in 2D or 3D environment. You can download it, if you want to try. I have different video tutorials to learn how to use freecad.

This technical drawing can be used in CAD programs to practice.

Part Design video tutorial includes


Creating constraints and dimensions in FreeCAD

-How to use constrain lock

-Mirroring parts in part design

-Creating additive pipe in FreeCAD

-How to change position of sketch in FreeCAD

 Video tutorial below

10 Mayıs 2023 Çarşamba

FreeCAD Mirror Tutorial in Part Design Workbench

 Part is created by mirror command. Firstly half of part is created on part design and 2D sketch, then mirror command is used to reflect other half. We can use mirrored to create symmetric drawings as a short way.

Technical drawing is below that used in video tutorial.


Part Design Mirrored command creates a new object (image) which is a reflection of the original object (source). The image object is created behind a mirror plane. The mirror plane may be standard plane (XY, YZ, or XZ), or any plane parallel to a standard plane.

 If you want, you can change planes or direction according to technical drawing or your preference. To use it, just follow simple steps below.

  1. Select the object from the Mirroring Panel list.
  2. Select a standard Mirror plane from the dropdown menu.
  3. Press OK to create mirrored object.
When you watch video tutorial below, You will see how to create part above and mirror in freecad.


24 Nisan 2023 Pazartesi

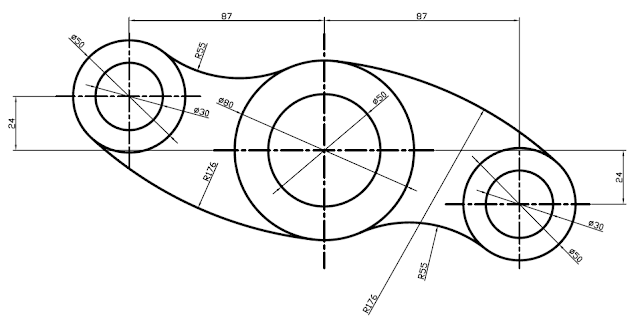
FreeCAD Part Design Tutorial 21

  Freecad is an open source CAD program to create your own designs or drawing in 2D or 3D environment. You can download it, if you want to try. I have different video tutorials to learn how to use freecad.

 This technical drawing can be used in CAD programs to practice.


Part Design video tutorial includes

  • Creating constraints and dimensions in FreeCAD
  • How to use constrain lock
  • Mirroring parts in part design
  • Creating additive pipe in FreeCAD
  • How to change position of sketch in FreeCAD
 Video tutorial below


How to create sketch without using plane and more

20 Nisan 2023 Perşembe

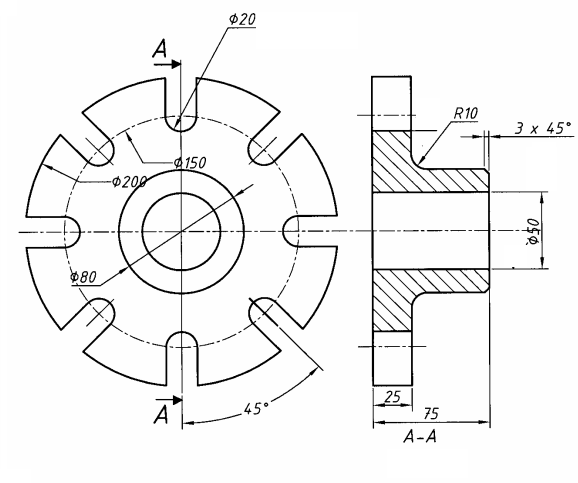
FreeCAD Part Design Tutorial 20

  FreeCAD part design tutorials will continue and you can see here more technical drawing with detail explanations. If you subscribe my youtube channel, Tutorials can be seen easily.

 This is 20th part design tutorial of technical drawing. 

 All dimensions are clear to create this part design which is shown in technical drawing. When you watch video tutorial, you will see all details of contraints.
  Tutorial contains
  • How to create construction circle in freecad
  • How to create tangent constrain, coincident constraint and point constraint
  • Creating construction line with angel constrain
  • Pad and pocket tutorial for beginners
  • Creating a rib in freecad
  • How to create polar pattern in freecad or Circular pattern
  • Fillet with changing radius
  • How to use refine in freecad for part design drawings
You will learn all these steps during video.


18 Nisan 2023 Salı

FreeCAD Rib Drawing

  FreeCAD has no Rib button like other CAD programs. Thats why you need to create a rib by drawing according to technical drawing. There are ways to create a rib; first way is by using a plane. I show it in this video. Second way without using a plane. This is easy one. After 2D design, you only change position of sketch. 

 When you change direction or angle of sketch in FreeCAD, we usually change Z direction and don't forget to use mid plane. When you watch video, you will understand better.

 Technical Drawing of this video tutorial.


  Video tutorial is below. I advise to you watch video to understand how to create a rib easily in FreeCAD. 


 If you want to watch more video tutorial, subscribe my youtube channel. I share freecad tutorials regularly. 

16 Nisan 2023 Pazar

FreeCAD Part Design Tutorial 19

   FreeCAD Part Design Video Tutorial Technical drawing is below..Video contains how to design this part in FreeCAD workbench. If you want to practice, you can watch all steps in video then you can create same drawing.


Drawing contains

  • How to decide starting plane in 2D sketch
  • Creating plane according to technical drawing
  • Using 2D sketch constraints relations
  • Creating constraints
  • Using Isometric View to create a sketch.
  • Adding Dimensions
  • Creating sketch without external geometry
  • Creating pad and pocket in symmetric to plane.
  • How to use symmetry button in FreeCAD 2D sketch
  • How to refine parts
 VIDEO TUTORIAL OF THIS PART


If you want see all these steps, I recommend to watch below video. Subscribe my youtube channel to see more CAD tutorials. I share tutorial videos regularly.

11 Nisan 2023 Salı

FreeCAD Part Design Tutorial 18

  FreeCAD Part Design Video Tutorial Technical drawing is below. This time, I create front and top view in drawing.Video contains how to design this part in FreeCAD workbench. If you want to practice, you can watch all steps in video then you can create same drawing.


Drawing contains

  • How to decide starting plane in 2D sketch
  • Creating plane according to technical drawing
  • Using 2D sketch constraints relations
  • Creating constraints
  • Using Isometric View to create a sketch.
  • Adding Dimensions
  • Using lock constraint
  • Creating sketch without external geometry
  • Creating pad and pocket in symmetric to plane.
  • How to use symmetry button in FreeCAD 2D sketch
  • Linear Pattern in 3D sketches
If you want see all these steps, I recommend to watch below video. Subscribe my youtube channel to see more CAD tutorials. I share tutorial videos regularly.

Video Tutorial 


30 Mart 2023 Perşembe

Technical Drawing of Isometric Part for CAD Design

  This technical drawing is created for CAD programs like Catia, Solidworks, FreeCAD, Inventor etc. You can practice for education. 


  To create this part in FreeCAD, Mirror,copy,symmetry,construction geometry and lock constraint commands in 2D sketch. Then pad,fillet and pocket command in 3D part design workbench. 

 This tutorial is created for beginners. Not only FreeCAD but also other CAD program users can  create easily,when you watch tutorial video.

If you want to watch video how to create this part, You can watch video below.


21 Mart 2023 Salı

How to Use Symmetry Constraint in FreeCAD?

 The Symmetry Constraint centers two selected points to be symmetrical around a given line, i.e., both selected points are constrained to lie on a normal to the line through both points and are constrained to be equidistant from the line. Alternatively it can constrain two points to be symmetric with respect to a third point.

 You can only use it with tree points or two points and a line. Symmetry button has an two important advantages. First one, It centers to drawings in 2D sketch. Second one is it helps to use less constraint like center, point and dimension.

 If you want to understand better how to use it, You should watch my video below. Also I add technical drawing of video to practice with it. 


 Video of this drawing is below. Don't forget to watch my video. You will understand how symmetry button works in FreeCAD.


 If I tell you how symmetry button works shortly. Firstly draw a line or geometric shape. Then follow steps below. There are two working principle of this constraint button.

  • Click the symmetry button first: select the first point, then the symmetry reference point, and finally the second point.
  •  Click the symmetry button last: select the first point, then the second point, and finally the symmetry reference point.
If you want see more video tutorial or different information videos like that, Subscribe my channel. You will have a chance to see more beneficial contents.

 Don't forget to check latest update of FreeCAD. It is an open source program, thats why it can have a new versions. You can see link here: https://www.freecad.org/downloads.php

18 Mart 2023 Cumartesi

FreeCAD Assembly 4 Tutorial Manual

  Assembly 4 Video tutorial helps to understand how to create LCS of parts and how to attach assembly parts in FreeCAD Assembly 4 workbench.

 When you watch video, you can follow assembly notes here. This will be useful to create and select parts easily. You should follow order of assembly parts like in video .

 After opening assembly parts and creating LCS coordinates, You will follow these steps.

 I start with first part which is base. You don't need to create any LCS. Base part is fixed, so fixed parts inserted directly without coordinates. You need to just click parent assembly.


 Second part is Bush. This time LCS coordinates are selected like below picture. Click hole axis both side in list. After that click 2 times rotate y axis button to obtain right position of bush part.


 You need to do same things for second bush. Part is same, so assembly process is not different. You just click hole axis for base and bush.


 Third part is Pivot. It has only one LCS which is hole axis. Firstly click hole axis than click LCS bush face. After that click 2 times "rotate Y axis" button then click 3 times "rotate Z axis " button to complete pivot assembly.


 Fourth part is washer. It also has one LCS. It attaches to "Base" part. Click LCS washer for attached part like in picture.


 Fifth part is bolt. After inserting it, you need to click LCS bolt and washer to complete assembly of bolt part.  Just click LCS bolt and LCS washer like below picture. After that enter 2mm thicknes in Z direction.


 Last part is nut. It has one LCS to attached base part. Click LCS nut in assembly list. You don't need to rotate or enter dimension. 


 If you watch video below, You will understand better how Assembly 4 works in FreeCAD.


12 Mart 2023 Pazar

FreeCAD Part Design Tutorial 14

 FreeCAD Part Design Video Tutorial Technical drawing is below. This time, I create front and top view in drawing.Video contains how to design this part in FreeCAD workbench. If you want to practice, you can watch all steps in video then you can create same drawing.

 Both technical drawings use for same part design tutorial. First one is for how to decide starting plane. Thats why views have no dimensions. Both view can be used according to part.


Drawing contains

  • How to decide starting plane in 2D sketch
  • Creating datum plane according to technical drawing
  • Using 2D sketch constraints relations
  • Creating constraints
  • Using Isometric View to create a sketch.
  • Adding Dimensions
  • Using lock constraint
  • Creating sketch without external geometry
  • Creating pad and pocket in symmetric to plane.
  • How to use symmetry button in FreeCAD 2D sketch
  • Mirror tool in 2D and 3D sketches
  • How to copy in FreeCAD
  • Cloning in FreeCAD 2D sketch
  • Creating Rib and Support part in FreeCAD
If you want see all these steps, I recommend to watch below video. Subscribe my youtube channel to see more CAD tutorials. I share tutorial videos regularly.


9 Mart 2023 Perşembe

FreeCAD Part Design Tutorial 13

  FreeCAD Part Design Video Tutorial Technical drawing is below. This time, I create two drawings with views.Video contains how to design this part in FreeCAD workbench. If you want to practice, you can watch all steps in video then you can create same drawing.

 Both technical drawings use for same part design tutorial. First one is for how to decide starting plane. Thats why views have no dimensions.


 Drawing contains

  • How to decide starting plane in 2D sketch
  • Creating datum plane according to technical drawing
  • Using 2D sketch constraints relations
  • Adding constraints
  • Using Isometric View to create a sketch.
  • Adding Dimensions
  • Using lock constraint
  • Creating sketch without external geometry
  • Creating pad and pocket in symmetric to plane.
When you watch below video, You will see how to do these in FreeCAD


5 Mart 2023 Pazar

FreeCAD Sketcher Constrain Lock

 Constraint Lock applies  Horizontal distance and Vertical distance constraints to selected vertices (points) in the sketch. If a single vertex is selected, the horizontal and vertical distance constraints will refer to the sketch origin point. If two or more points are selected, horizontal and vertical distance constraints will be added for each pair of points.

 It provides easiness which helps to create desired constraints in 2D sketch. Lock constraint button is located on top sides of constraints set.

 This is the picture of lock constraint 


TECHNICAL DRAWING OF VIDEO TUTORIAL


  How to use lock constraint ? Read these 3 steps to use it.

1- Select one or more vertices (points) in the sketch.

2-Press the Sketcher Constrain lock button.

3-To edit the constraints values, double-click on a constraint value in the 3D view, or double-click on the constraint or right-click and select Edit value in the Constraint list in the Tasks tab.

 This is technical drawing is created by using lock constraint button. 

Video tutorial is below


3 Mart 2023 Cuma

FreeCAD Revolution Tutorial

  Revolution tool is used to create a solid by revolving a selected sketch according to axis. It provides an easiness instead of pad and circles commands. One sketch helps to create a 3d sketch without any other tools or commands. 

  Revolution tool is called as different names like shaft depends CAD programs. Tool has  same mission. 

 Now If i tell how to use this tool shortly;

  • Select the sketch to be revolved. A face on the existing solid can alternatively be used.
  • Press the PartDesign Revolution.svg Revolution button.
  • Set the Revolution parameters (see next section).
  • Lastly Press OK to complete 3d sketch.
 You can change axis according to desired drawing. It revolves automatically around vertical sketch axis, when you don't change anything.

 Technical drawing for revolve video tutorial


 Technical drawing has two views which are top and section. Firstly, half of section view is used, then both view will be used to create dimension and revolve in part design.
 If you want to understand and how to create revolution in freecad, I advise to you watch below video.

 When creating a revolution, the Revolution  dialogue offers several parameters specifying how the sketch should be revolved. First parameter is axis.

This option specifies the axis about which the sketch is to be revolved.

  • Vertical sketch axis: selects the vertical sketch axis.
  • Horizontal sketch axis: selects the horizontal sketch axis.
  • Construction line: selects a construction line contained in the sketch used by the Revolution. The drop down list will contain an entry for each construction line.
  • Base (X/Y/Z) axis: selects the X, Y or Z axis of the Body's Origin
  • Select reference..: allows selection in the 3D view of an edge on the Body, or a datum line.
Angle
 This controls the angle through which the revolution is to be formed, e.g. 360° would be a full, contiguous revolution. The images in the examples section demonstrate some of the possibilities with specifying different angles. It is not possible to specify negative angles (use the Reversed option instead) or angles greater than 360°.

Symmetric to plane
 If checked, the revolution will extend half of the specified angle in both directions from the sketch plane.

Reversed
 If checked, the direction of revolution is reversed from default clockwise to counterclockwise.

25 Şubat 2023 Cumartesi

FreeCAD Part Design Tutorial 11

 FreeCAD Part Design Video Tutorial Technical drawing is below. Video contains how to design this part in FreeCAD workbench. If you want to practice, you can watch all steps in video then you can create same drawing.


 Drawing contains

  • Adding plane
  • Creating rib
  • Using 2D sketch constraints relations
  • Adding constraints
  • Using Isometric View to create a sketch.
  • Adding Dimensions
  • Using Mirrored Command
  • Creating Chamfers
  • Creating pad and pocket in symmetric to plane.
When you watch video below, You will see how to do these in FreeCAD
 
Follow my youtube channel to see different CAD tutorials.

22 Şubat 2023 Çarşamba

FreeCAD Part Design Tutorial 10 Isometric Drawing with Dimensions

  FreeCAD Part Design Video Tutorial Technical drawing is below. Video contains how to design this part in FreeCAD workbench. If you want to practice, you can watch all steps in video then you can create same drawing.

 Drawing contains

  • Adding plane
  • Creating rib
  • Using 2D sketch constraints relations
  • Adding  constraints
  • Using Isometric View to create a sketch.
  • Adding Dimensions
  • Creating plane
  • Creating Chamfers
  • Hide and show datum plane in FreeCAD
  • Creating pad and pocket in symmetric to plane.


When you watch video below, You will see how to do these in FreeCAD


This is tenth part design tutorial. If you want to watch other freecad tutorials, Follow my channel. I share freecad tutorials regularly.

 FreeCAD is one of the open source CAD software. That's why it can have a update. If you want to use or try latest version. Check freecad official website. I use 0.20 version of FreeCAD. Follow FreeCAD website to download latest version.

20 Şubat 2023 Pazartesi

FreeCAD Part Design Tutorial 9 Isometric Drawing with Dimensions

  FreeCAD part design tutorial technical drawing is below. This is the ninth part design tutorial and tutorials will continue. If you want to watch tutorial or practice with this part, I recommend to you follow my channel. You will see all steps of tutorial.


 Drawing Includes;

  • Selecting 2D plane to start a drawing( which plane should be selected? xy,yz or xz planes)
  • Using a isometric view.
  • Creating constraints in 2d workbench
  • Drawing Centered rectangle 
  • Changing dimension in FreeCAD( 2d -3d)
  • Adding Dimensions in 2d environment
  • Creating pad and selecting faces to draw 2d sketch
  • Understanding which plane is used in FreeCAD

 Ninth part design helps to understand these list. I share a video here. You can watch my video and see technical drawing above. I recommend to watch video. I tell you how to draw it.
                          TUTORIAL VIDEO IS HERE


 If you subscribe and follow my channel. You can watch different freecad tutorials. I share videos regularly on my youtube channel.

15 Şubat 2023 Çarşamba

FreeCAD Part Design Tutorial 8

  FreeCAD part design technical drawing is below. It can be used for CAD programs for practice. You can improve your CAD skills. I add different FreeCAD tutorials. 

 Part Design 8 Technical Drawing


 Video Tutorial is below


 I have also freecad assembly, technical drawing and 2D sketch videos. Don't forget to subscribe my channel to see more FreeCAD contents. 

 FreeCAD is an open source program. Its free, this means you don't need to pay money for this program. Just download from freecad website and set up.

9 Şubat 2023 Perşembe

FreeCAD Part Design Tutorial 7 Drawing

  Part design tutorial includes 2d sketch and 3d design with constraints. This drawing is generally used 2d commands. Drawing is created on YZ plane (front view). According to technical drawing, plane place is defined.

 This is the technical drawing of Part Design Tutorial


 This is the front view of technical drawing. Rim rim point command is used to create this drawing. It works like tangent tangent radius command in Autocad. You can use it for corner radius.

Video tutorial of technical drawing below


4 Şubat 2023 Cumartesi

FreeCAD Part Design Tutorial 6 Isometric Drawing with Dimensions

  FreeCAD part design tutorial technical drawing is below. This is the 6th part design tutorial and tutorials will continue. If you want to watch tutorial or practice with this part, I recommend to you follow my channel. You will see all steps of tutorial.


 Drawing Includes;

  • Selecting 2D plane to start a drawing( which plane should be selected? xy,yz or xz planes)
  • Using a isometric view.
  • Creating constraints in 2d workbench
  • Changing dimension in FreeCAD( 2d -3d)
  • Adding Dimensions in 2d environment
  • Creating pad and selecting faces to draw 2d sketch
  • Understanding which plane is used in FreeCAD
 6th part design helps to understand these list. I share a video here. You can watch my video and see technical drawing above. I recommend to watch video. I tell you how to draw it.
                          TUTORIAL VIDEO IS HERE


3 Şubat 2023 Cuma

Part Design Tutorial 5 Technical Drawing

  FreeCAD Part Design Video Tutorial Technical drawing is below. Video contains how to design this part in FreeCAD workbench. If you want to practice, you can watch all steps in video then you can create same drawing.


 Drawing contains

  • Adding plane
  • Creating rib
  • Using mirror command
  • Adding constraints
  • Adding Dimensions
  • Creating Chamfers
  • Hide and show planes in FreeCAD
  • Creating pad and pocket in symmetric to plane.
When you watch video below, You will see how to do these in FreeCAD.

 This is 5th part design tutorial. If you want to watch other freecad tutorials, Follow my channel. I share freecad tutorials regularly.
 FreeCAD is one of the open source CAD software. That's why it can have a update. If you want to use or try latest version. Check freecad official website.

15 Ocak 2023 Pazar

FREECAD PART DESIGN TUTORIAL ISOMETRIC DRAWING

  FreeCAD Part design Video Tutorial Drawing


 Video contains adding constraints, how to enter dimension, how to mirror in part design,how to create filled in sketch and how to change color of part.

 Video Tutorial is Technical Drawing 


 This tutorial is for beginners. If you want to see more freecad tutorials, you can follow my channel. I make a frecad videos regularly. Also you can practice with technical drawings.

 Freecad release new version is 0.20. Visit freecad website and download latest version. 

14 Ocak 2023 Cumartesi

Autocad Tan Tan Radius(ttr) Command

  Autocad Tan Tan Radius(ttr) is one of the helpful commands in Autocad. It provides an easiness for radius or circle drawings. When you draw corner radius, you don't need to select constraint every time. Ttr command find the catch tangent directly and draw radius of circles.

 Video of Technical Drawing is below 


 I will write here all steps of tan tan radius comment.

 Firstly open object snap,3d snaps,ortho mod and dynamic input. You can see how to open them from video.

  •  Click circle or write c then press "enter" key. Then write "ttr" and press enter key from keyboard.
  • Click circles tangents then enter radius. Press enter key. You will see circle with a radius.
Tan tan radius command works with circle drawing like shown in drawing. 
 
Video is below, if you want see all steps of tan tan radius command


13 Ocak 2023 Cuma

Autocad Tracking Command

  Tracking is one of the useful command in Autocad. It helps to define objects places without using lines. 

 I tell you shortly how to use it. First click or write object( circle,line etc.) then write "tk" from keyboard. Then according to drawing or place enter x and y distance length. After that press enter key from keyboard. Its very easy to apply it.

 Technical Drawing for video


 If you want to see how tracking command works, you should watch below video. You will understand with drawing.


12 Ocak 2023 Perşembe

YOUTUBE PARA KAZANMA ŞARTLARI OCAK 2023

  Ocak ayının 2023 yılında Youtube para kazanma şartlarında değişiklik gerçekleştirdi. Bilindiği gibi son zamanlarda sosyal medya ve birçok telefon uygulamalarında kısa videolar yaygınlaştı. Bunun sonucunda izleyiciler kısa videolara yöneldi ve içerik üretenler de kısa videolar çekmeye başladı.

 Youtube da kısa videolara artan ilgi nedeniyle "Youtube Shorts" adı altında kısa video yükleme sekmesini oluşturarak kullanıcılarına diğer video uygulamalarına benzer bir seçenek sundu. Buna bağlı olarak Youtube 2023 yılında para kazanma şartlarında değişiklik yaptı.

 Ocak 2023' den itibaren geçerli olacak para kazanma şartları

1.Son 12 ayda, herkese açık içeriklerin izlenme süresi hedefi olan 4.000 geçerli saate ulaşmak ve 1.000 abone kazanmak .

2.Son 90 gün içinde, herkese açık Shorts videosu görüntüleme sayısı hedefi olan 10 milyon geçerli görüntülemeye ulaşmak ve 1.000 abone kazanmak.


 İçerik üreticilerin yada youtube da para kazanmak isteyenlerin bu yeni şarta dikkat etmeleri gerekiyor. Güncellenen şartlara göre içeriklerini düzenlemeleri youtube tarafından isteniyor. Ek olarak videolarında youtube tarafından belirlenen kriterlere uygunluğunun olması gerekiyor. 

 Güncellenen yeni şarta göre artık youtube da kısa videoları daha çok göreceksiniz. Aslında Youtube dan gelir elde etme şartını sağlamak isteyen kullanıcılar için bir fırsat olarak görünüyor. Sadece 60 saniye ve altındaki kısa videolarla görüntüleme sağlayabilme şansları ortaya çıktı.

10 Ocak 2023 Salı

FreeCAD 0.20 Part Design Tutorial 3

  FreeCAD Part Design tutorial is shown youtube with all details in youtube video. Technical drawing is attached here and below video.

 You can look here to practice with video.

 If you want to see different FreeCAD videos, you can subscribe my youtube channel. You can watch many CAD video tutorials. I add technical drawings of tutorial. You can use it any CAD programs


 Video contains pad, circular pattern, 2d mirror, construction line and pocket commands. You can see all steps with explanations

 Part Design Video Tutorial of this technical drawing below.


 I will continue with other part design and FreeCAD tutuorial. All drawing and video tutorial will be shared on this blog. 

 New version of FreeCAD is released. I advise to you download it. New features are added. Also many bugs and errors are fixed. 

 FreeCAD is an open source CAD program. Open source programs can have bugs, so FreeCAD always have updates. You should check FreeCAD website to follow new versions. 

1 Ocak 2023 Pazar

FreeCAD Sled Technical Drawing for Assembly 4

  This technical drawing is prepared in FreeCAD techdraw workbench for Assembly 4 video tutorial. All details and dimension are added with video. 

  To Magnify technical click it

 Firstly 3 parts of sled are drawed in part design. Then coordinates are added in Assembly 4 workbench then All parts are assembled. Lastly wood texture view added. 

  •  Firstly Add new coordinates
  • After adding new coordinates click save button
  • Save Assembly file to assemble all parts
  • Lastly Click insert button and select drawing parts according to coordinates.
 When you follow these steps, you can make an assembly without any errors.

 If you want to see video tutorial, You can click below video.


Don't forget to follow my channel and like the video. I share videos regularly.