freecad assembly 4 etiketine sahip kayıtlar gösteriliyor. Tüm kayıtları göster

18 Mart 2023 Cumartesi

FreeCAD Assembly 4 Tutorial Manual

  Assembly 4 Video tutorial helps to understand how to create LCS of parts and how to attach assembly parts in FreeCAD Assembly 4 workbench.

 When you watch video, you can follow assembly notes here. This will be useful to create and select parts easily. You should follow order of assembly parts like in video .

 After opening assembly parts and creating LCS coordinates, You will follow these steps.

 I start with first part which is base. You don't need to create any LCS. Base part is fixed, so fixed parts inserted directly without coordinates. You need to just click parent assembly.


 Second part is Bush. This time LCS coordinates are selected like below picture. Click hole axis both side in list. After that click 2 times rotate y axis button to obtain right position of bush part.


 You need to do same things for second bush. Part is same, so assembly process is not different. You just click hole axis for base and bush.


 Third part is Pivot. It has only one LCS which is hole axis. Firstly click hole axis than click LCS bush face. After that click 2 times "rotate Y axis" button then click 3 times "rotate Z axis " button to complete pivot assembly.


 Fourth part is washer. It also has one LCS. It attaches to "Base" part. Click LCS washer for attached part like in picture.


 Fifth part is bolt. After inserting it, you need to click LCS bolt and washer to complete assembly of bolt part.  Just click LCS bolt and LCS washer like below picture. After that enter 2mm thicknes in Z direction.


 Last part is nut. It has one LCS to attached base part. Click LCS nut in assembly list. You don't need to rotate or enter dimension. 


 If you watch video below, You will understand better how Assembly 4 works in FreeCAD.


15 Şubat 2023 Çarşamba

FreeCAD Part Design Tutorial 8

  FreeCAD part design technical drawing is below. It can be used for CAD programs for practice. You can improve your CAD skills. I add different FreeCAD tutorials. 

 Part Design 8 Technical Drawing


 Video Tutorial is below


 I have also freecad assembly, technical drawing and 2D sketch videos. Don't forget to subscribe my channel to see more FreeCAD contents. 

 FreeCAD is an open source program. Its free, this means you don't need to pay money for this program. Just download from freecad website and set up.

15 Ocak 2023 Pazar

FREECAD PART DESIGN TUTORIAL ISOMETRIC DRAWING

  FreeCAD Part design Video Tutorial Drawing


 Video contains adding constraints, how to enter dimension, how to mirror in part design,how to create filled in sketch and how to change color of part.

 Video Tutorial is Technical Drawing 


 This tutorial is for beginners. If you want to see more freecad tutorials, you can follow my channel. I make a frecad videos regularly. Also you can practice with technical drawings.

 Freecad release new version is 0.20. Visit freecad website and download latest version. 

1 Ocak 2023 Pazar

FreeCAD Sled Technical Drawing for Assembly 4

  This technical drawing is prepared in FreeCAD techdraw workbench for Assembly 4 video tutorial. All details and dimension are added with video. 

  To Magnify technical click it

 Firstly 3 parts of sled are drawed in part design. Then coordinates are added in Assembly 4 workbench then All parts are assembled. Lastly wood texture view added. 

  •  Firstly Add new coordinates
  • After adding new coordinates click save button
  • Save Assembly file to assemble all parts
  • Lastly Click insert button and select drawing parts according to coordinates.
 When you follow these steps, you can make an assembly without any errors.

 If you want to see video tutorial, You can click below video.


Don't forget to follow my channel and like the video. I share videos regularly.


18 Ağustos 2022 Perşembe

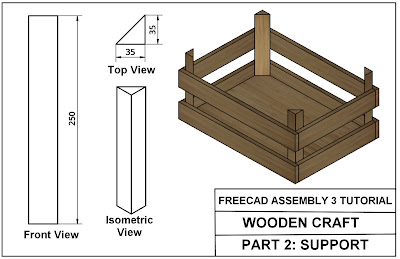
FREECAD ASSEMBLY 3 TUTORIAL TECHNICAL DRAWINGS

  FreeCAD Assembly 3 workbench are mentioned in this blog. You can check previous drawings, if you want more tutorials or details. This is the third tutorial of Assembly 3. 

 Assembly Part name is Wooden Craft. Four parts are shown on video at the same time Assembly of these parts are showed in Assembly 3 workbench. During video, you will see how to add constraints in Assembly 3 workbench.

 Last part of video, it shows how to add texture in FreeCAD. Link of texture is added. You can add any different texture here.


To magnify technical drawings, click them. All drawings are created in FreeCAD. 


 Assembly 3 video series will continue. If you subscribe my channel, you will see more video or different tutorials of FreeCAD.


26 Nisan 2022 Salı

FreeCAD Assembly 4 Tutorial

  FreeCAD is one of the  open source CAD program which includes many work benches like assembly,animation, technical drawing and CAM etc. I share part design and technical drawing tutorial videos and explanations. This time I give an information about Assembly. 

  I add technical drawing of Assembly 4 tutorial below. Click picture to see clearly.


  This drawing includes 3 parts. I also add tutorial video. I draw all parts then I assemble them on Assembly 4 workbench. You can watch all steps and details.


  You need to draw all parts to assemble in FreeCAD. Actually it is same like other CAD programs.

 I will tell how to use Assembly 4 in FreeCAD step by step.

  • Firstly click Assembly 4 from workbench and open Assembly 4.
  • Then Click Part "create a new document " from top left side.
  • Select "Create a new part" button and write a name for part then click ok.
  • Now click part and click "create a new body" button. Enter a name for body. Click ok.
  • Select body and right click " Toggle active body" to start 2D sketch.
  • Click plane according technical drawing or select which plane you want.
  • Complete your drawing, if you draw other part after finishing parts click save button and enter name. Click save. 
  • After completing parts drawings. Click new document button and enter name. This document will be Assembly document. This means we will insert all drawing parts here.
  • We need to add LCS coordinates. To do this click "create datum object" . We will select coordinates according to part shape from list. 
  • After completing LCS coordinates, Click " Create a new model" button then "click "insert a link to a Part". 
  • Lastly when you insert a part select LCS according to parts.
I recommend to watch video to understand better how assembly 4 works in FreeCAD.

28 Ağustos 2021 Cumartesi

FreeCAD Propeller Technical Drawings

  FreeCAD Assembly 4 Animation Tutorial Technical Drawings

Click picture to enlarge picture, If you want to see dimensions clearly.

1)Base(Part 1)

2) Propeller(Part2)

21 Nisan 2021 Çarşamba