FreeCAD assembly 3 tutorial etiketine sahip kayıtlar gösteriliyor. Tüm kayıtları göster

15 Ocak 2023 Pazar

FREECAD PART DESIGN TUTORIAL ISOMETRIC DRAWING

  FreeCAD Part design Video Tutorial Drawing


 Video contains adding constraints, how to enter dimension, how to mirror in part design,how to create filled in sketch and how to change color of part.

 Video Tutorial is Technical Drawing 


 This tutorial is for beginners. If you want to see more freecad tutorials, you can follow my channel. I make a frecad videos regularly. Also you can practice with technical drawings.

 Freecad release new version is 0.20. Visit freecad website and download latest version. 

30 Ağustos 2022 Salı

Assembly Technical Drawing

  Assembly 3 technical drawing includes three parts which are shown in video tutorial. All needed detail views are added and if you want to see how to draw toy cradle parts, I recommend to watch video below.

 This assembly technical drawing can be used other CAD programs which have assembly workbench.Also this is fourth assembly 3 tutorial in FreeCAD. If you want to see other video tutorial, you can watch previous videos or You can subscribe my youtube channel to see different tutorials or drawings. I always add technical drawings for freecad video tutorials.

 This time, I show Toy Cradle tutorial. Technical drawing below. Click on picture to magnify it.


 These three parts draw and assembly in Assembly 3 workbench. After finishing drawings and assembly, wooden texture is added to assembly. You can watch how to render texture from video. Also texture link is added video below.

 Texture view is below.


 You can also check wireframe design of cradle.


18 Ağustos 2022 Perşembe

FREECAD ASSEMBLY 3 TUTORIAL TECHNICAL DRAWINGS

  FreeCAD Assembly 3 workbench are mentioned in this blog. You can check previous drawings, if you want more tutorials or details. This is the third tutorial of Assembly 3. 

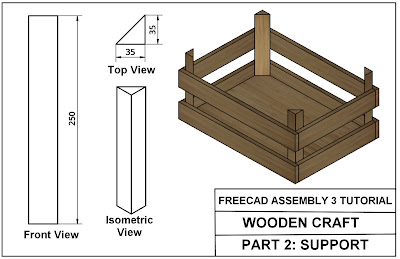
 Assembly Part name is Wooden Craft. Four parts are shown on video at the same time Assembly of these parts are showed in Assembly 3 workbench. During video, you will see how to add constraints in Assembly 3 workbench.

 Last part of video, it shows how to add texture in FreeCAD. Link of texture is added. You can add any different texture here.


To magnify technical drawings, click them. All drawings are created in FreeCAD. 


 Assembly 3 video series will continue. If you subscribe my channel, you will see more video or different tutorials of FreeCAD.


1 Temmuz 2022 Cuma

Assembly Technical Drawing

  Bottle Caddy Assembly Technical Drawing 

 Bottle Caddy is created by four parts which used in Assembly environment. I prefer to use FreeCAD program. You can use any CAD program which has Assembly workbench.

 Assembled bottle caddy contains eight parts. Four parts are copied, so I will share four technical drawings. 

 Click technical drawings to magnify them. 

 If you want to watch the video how to create assembly of these drawings. You check below video.


All parts are included with details and dimensions. Drawings are tested and used in Assembly workbench.


 If you want see more assembly technical drawings. You can check my blog.I usually share technical drawing with different levels for CAD program users.
 You can subscribe my youtube channel to understand drawing of technical drawings. If you have an interest with different CAD programs, I recommend to watch my videos.

31 Mayıs 2022 Salı

FreeCAD Assembly 3 Tutorial

  FreeCAD is one of the open source drawing program is used for various purposes like drawing(2D,3D), assembly, analysis,technical drawing etc. l show Assembly 2 plus, assembly 4 samples.If you want to check them, you can read my latest writings. This time I will tell Assembly 3 tutorial. Its simple tutorial for beginners.

  I will use this technical drawing below and If you want to understand Assembly 3 tutorial, you should watch video below. Click picture to magnify it.


 Steps for Assembly Tutorial

  • Draw 3 parts in part design as you see technical drawing
  • After drawing parts dont forget to save them. You can create a new folder.
  • Click Assembly 3 from workbench, if you haven't installed yet, set up from addon manager.
  • Create an new file for assembly and click save button. Click Create an assembly button.
  • Select all drawing parts and move it assembly parts.
  • After that you use constraint buttons according to parts shape.
  • After completing constraints, click solve constraint button. 
  • Watch the video to see all steps with details.